![Bridebook-logo-blue (1)-1.png]](https://support.bridebook.com/hs-fs/hubfs/Bridebook-logo-blue%20(1)-1.png?height=20&name=Bridebook-logo-blue%20(1)-1.png)
Planning your big day (and everything around it!) is simple with Bridebook. From organising your guest list to managing multiple events and collecting RSVPs, everything works together in one place.
👤 Guest List
You can access your Guest List from the Planning section on both the Bridebook app and desktop.
When you first open your Guest List, you'll find two blank guest categories ready for you and your partner to start adding guests.
✨ What you can do:
- Add guests under separate categories for each partner
- Create additional guest categories (e.g. Bride's Family, Groom's Friends, Work Colleagues)
- Link guests together as couples or families
- Record important guest information including:
- Dietary requirements
- Contact details
- Email addresses
- Postal addresses (using the Address Collector)
- RSVP responses
- Guest notes and preferences
To view or edit a guest’s details, simply select their name from your Guest List.
➕ Adding Guests
Add guests individually
Open your Guest List and enter a name into the "Add guest's name" field.
Adding Guests in Bulk
Adding lots of guests? No problem, use the Bulk Add Guest feature.
📍 Where to find it:
- Desktop: Top right of the Guest List
-
Mobile App: Bottom of the Guest List
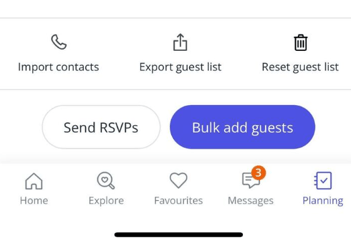
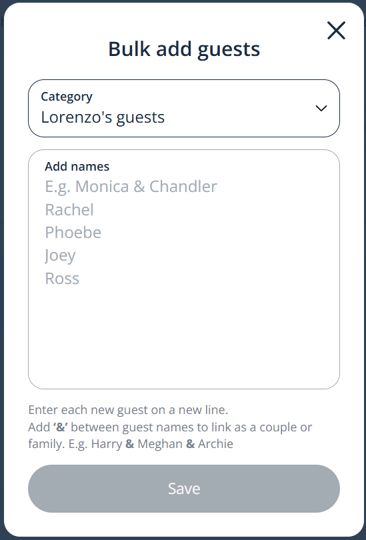
Add one guest per line and use "&" to link guests together.
Example:Sam Smith & Alex Smith
This will automatically create a linked couple or family group.
🗑️ Removing Guests
To delete an individual guest:
- Open the guest's profile
- Scroll to the bottom
- Select Delete Guest
🗂️ Creating Additional Guest Categories
Need more than the default categories?
Simply click Add a Category within your Guest List to create additional guest groups, such as:
- Family
- Friends
- Work Colleagues
- University Friends
- Evening Guests
This can help keep larger guest lists organised.
📨 Invitations & Guest Types
You can decide exactly which guests attend which parts of your wedding.
Common invitation types:
- All day guests
- Evening guests
Assigning guests to events
To manage invitations:
- Select a guest
- Choose which event(s) they are invited to
- Save their invitation settings
Filtering your Guest List
Use Guest List filters to quickly view:
- All Day guests
- Evening guests
- Specific categories
- RSVP statuses
📥 Import Your Guest List from a Spreadsheet
Upload your guests in bulk using our simple spreadsheet template and get RSVP-ready in minutes.
Planning your guest list elsewhere first? You’re not alone, many couples start in Google Sheets before moving into Bridebook. Now, you can easily bring that list straight into Bridebook and unlock powerful tools like RSVPs, guest messaging, and event management.
✨ Why import your guest list?
- Save time by adding guests in bulk
- Transfer an existing guest list from Excel or Google Sheets
- Quickly access:
- RSVP tracking
- Guest messaging
- Event planning tools
This feature is designed to make your planning smoother, faster, and more flexible 💙
📥 How to import your guest list
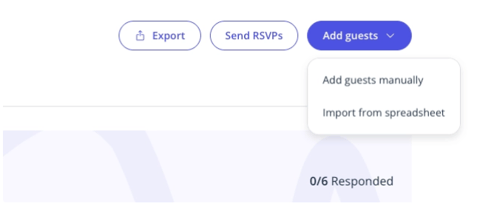
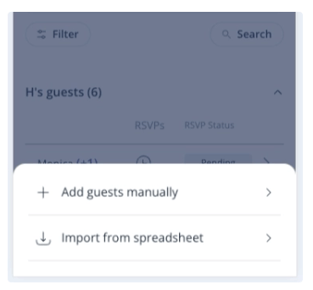
1. Open your Guest List
Go to:
Planning → Guest List → Add Guests → Import from Spreadsheet
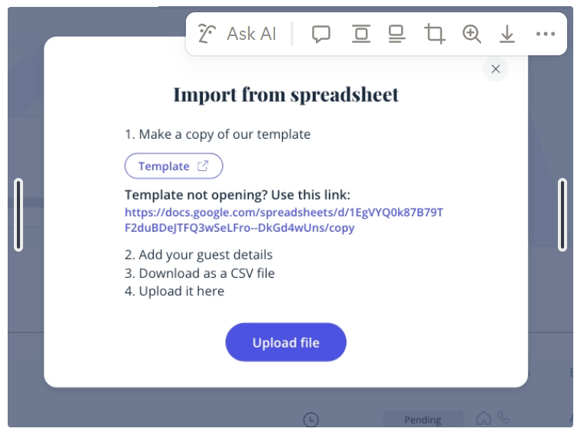
2. Open the template
A pop-up will guide you through the import process:
- Click Template
- Wait for the template to load
- A new tab will open
- If it doesn't open automatically, use the link provided in the pop-up
3. Create your own copy
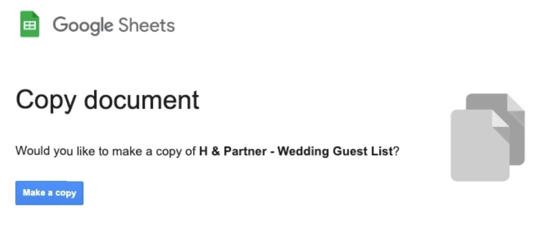
In Google Sheets:
- Click Make a copy
- This creates a private editable version saved to your Google Drive
4. Complete the spreadsheet
Add your guests into the sheet following these guidelines:
Required fields
✅ Guest Name
✅ Guest Group (e.g. Bride's Family, Groom's Friends)
Optional fields
➕ Plus Ones
📧 Email Addresses
🏠 Postal Addresses
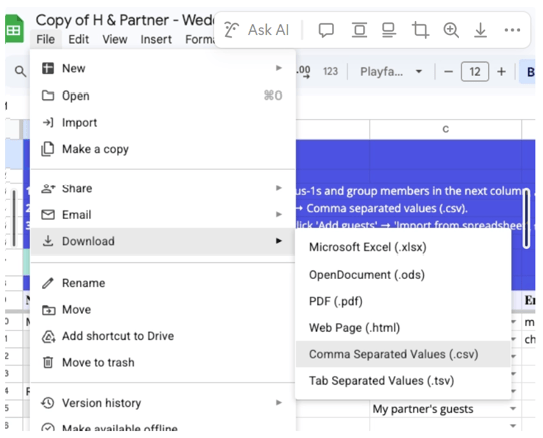
5. Download as CSV
When you've finished:
File → Download → Comma Separated Values (.csv)
This saves the correct file format to your device.
6. Upload to Bridebook
Return to Bridebook and:
- Click Upload File
- Select your CSV file
- Review the preview of imported guests
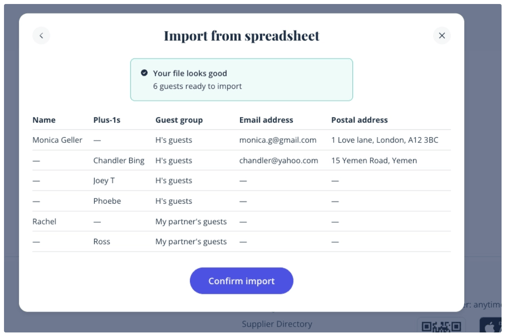
- Click Confirm Import
Your guests will instantly appear in your Guest List 🎉
⚠️ Important formatting rules
To ensure your upload works correctly:
- One guest per row only
(No combining names like “John & Sarah”) - Plus ones must be on a separate row
(e.g. add “Sarah” underneath “John”) - No duplicate names
(either within your file or already in Bridebook) - Stick to the template columns only
(extra columns won’t be recognised) - Maximum 250 guests per upload
(you can upload multiple files if needed)
⚠️ If there’s an issue with your file⚠️
Don’t worry — we’ll show you exactly what needs fixing:
- Errors will appear in a pop-up
- Each issue includes a row number for easy reference
- You’ll need to fix all errors before uploading again
🚨 Common upload errors & how to fix them:
| Error | Solution |
|---|---|
| File doesn't match template | Use the official template |
| Duplicate names | Remove or rename duplicates |
| Multiple names in one row | Separate each guest onto their own row |
| Extra columns detected | Remove unsupported columns |
| Upload fails | Copy data into a fresh template and try again |
🔄 Re-uploading a guest list
Spreadsheet import is designed for adding new guests rather than editing existing ones.
If you want to import the same guests again, you'll need to:
- Delete those guests first, or
- Reset your Guest List and start fresh
🔒 Your data & privacy
Your spreadsheet is completely private to you.
- When you click “Make a copy”, the file is saved in your own Google Drive
- Bridebook does not store or access your spreadsheet outside of the upload process
📤 Exporting Your Guest List
Need a copy of your Guest List?
Desktop
The Export button is located at the top of your Guest List.
Mobile App
The Export button can be found at the bottom of your Guest List.
⚠️ Excel users: Troubleshooting: Guest information appears in a single column
If you export your Guest List and open the file directly in Microsoft Excel, you may find that all guest information appears in a single column instead of being separated into individual columns.
This happens because Excel may not automatically recognise the file'ssettings.
How to fix it
Instead of opening the CSV file directly:
-
- Open Microsoft Excel
- Select Import (rather than Open)
- Choose your exported guest list file
- Select Delimited when prompted
- Set the file encoding to UTF-8
- Choose Comma (,) as the delimiter
- Complete the import
Your guest information should now appear correctly across separate columns.
💡 This is an Excel formatting issue rather than a problem with the exported file itself.
🔄 Resetting Your Guest List
If you want to completely clear your Guest List:
- Open Guest List
- Scroll to the bottom of the page
- Select Reset Guest List
⚠️ Resetting your Guest List will permanently remove all guests and leave your list empty.
Accidentally deleted guests or categories?
If you've accidentally deleted a guest, category, or your entire Guest List, please contact our Customer Support Team. We'll do our best to restore any missing data.
💌 Wedding Website & RSVPs
Once your guest list is set up, you can collect RSVPs through your Wedding Website.
📌 A Guide to Your Bridebook Wedding Website
📌 Everything You Need to Know About RSVPs